Home » Products » Coating Inspection » Surface Preparation » Surface Profiles – Blasted » Elcometer 125 Surface Comparators
Elcometer 125 Surface Comparators

Product Description
Elcometer 125 Surface Comparators
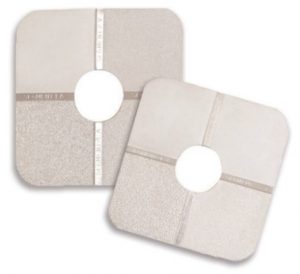
These extremely durable surface comparators allow the estimation of surface profile of either grit or shot blasted surfaces.
Using the Elcometer 125 Surface Comparators as a reference the blasted profile can be compared to the four reference profile grades in each comparator. Profiles are recorded in microns. 4 Profile Values per Comparator.
Features the Elcometer 125 Surface Comparators
• Available in both Grit and Shot
• The ISO 8503 Parts 1 and 2 standard specifies the roughness in metric units only.
• The Elcometer 125 is the only comparator to conform to ISO 8503 Parts 1 and 2.
The Elcometer 125 Surface Comparators can work in accordance with:
• AS 3894.5
• ASTM D 4417-A
• IMO MSC.215(82)
• MO MSC.244(83)
• ISO 8503-1
• ISO 8503-2
• SSPC PA 17
*Standards not in bold have been superseded but are still recognised in some industries.
Specifications
Elcometer 125 Surface Comparators – Specifications
| Part Number | Description | Section Profiles |
| E125—-1 | Elcometer 125 Grit Surface Comparator | 25, 60, 100, 150µm |
| E125—-2 | Elcometer 125 Shot Surface Comparator | 25, 40, 70, 100µm |
Packing List
- Elcometer 125 Grit / Shot Surface Comparator
- Protective Pouch
- Certificate of Conformance
- Instruction Manual
Data Sheet
Standards
Elcometer 125 Surface Comparators – Standards
The Elcometer 125 Surface Comparators can work in accordance with:
• AS 3894.5
• ASTM D 4417-A
• IMO MSC.215(82)
• MO MSC.244(83)
• ISO 8503-1
• ISO 8503-2
• SSPC PA 17
*Standards not in bold have been superseded but are still recognised in some industries.
Instruction Manual
Elcometer 125 Surface Comparators – Instruction Manual
Elcometer 125 Surface Comparators – Instruction Manual
Video
Elcometer 125 Surface Comparators – Video
Surface Comparators are used to quickly assess the surface profile of a blasted metal surface.
Surface Comparators are a flat, steel plate which contain a number of reference surface profiles, formed on a corrosion resistant metal.
These reference profiles are then compared to the freshly blasted surface – many comparators have a hole in the middle to make this comparison easier – and a profile grade is then defined by the inspector.
Due to the speed of the test, this method is especially useful when you want to go from blasting to painting as quickly as possible to avoid flash rust, or when measuring in hazardous areas where electronic equipment is prohibited.
Elcometer has a range of surface comparators for use with different standards and for different profile finishes.
With all loose dust and debris removed from the test surface, place the appropriate surface comparator against it, and compare, in turn, the test surface with each segment of the comparator.
This can be done with the assistance of a magnifier if necessary. We recommend a x5 magnifier, as it allows you to easily compare the surface with a single segment of the comparator in great detail.
If visual assessment proves difficult, it is possible to do a tactile assessment – in other words, touch.
Once you’ve assessed the profile against each segment of the comparator, you determine the grade. This is not a case of simply choosing which segment the profile is closest to – it is defined as follows:
If the profile is smoother than segment 1, the finest grade on the comparator, it is Finer-than-Fine.
If the profile is equal to segment 1 and up to, but excluding segment 2, it is Fine.
If the profile is equal to segment 2 and up to, but excluding segment 3, it is Medium.
If the profile is equal to segment 3 and up to, but excluding segment 4, it is Coarse.
And finally, if any profile is assessed as being rougher than segment 4, it is Coarser-than-Coarse.
Simply record your result, and then test another area of the surface.

